
|
Revival Reformation
Classics |
|
|
For educational purposes only. Do not copy without
permission. Experiment lawfully at your own risk. John Bedini's "Simplified School Girl" Radiant Energy Oscillator and Energizer Motor
Special thanks to John
Bedini for giving us these plans and for making them easy for simple people!
 Now selling John's book, a few DVDs and an SSG parts kit: rpmgt.org/order.html The following is the Yahoo forum we are using to discuss and build these machines: Some of the plans for building this device come from the following web site (not all information on that site is correct): peswiki.com/index.php/Directory:Bedini_SG The
theory and information behind this are found at the following John Bedini webs sites:
energenx.com/john1/index001.html, energenx.com/john1/intro.html,
energenx.com/john1/john1.html Energenx.com Products r-charge.com
THIS PART BELOW IS OLD AND COULD NEED UPDATES.
Rick's Temporary
Charger:
Picture 1 is with 9 volt batteries; picture 2 is with a deep
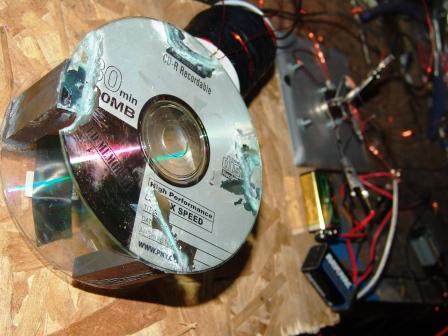
cell 12 volt battery (as the imput) and a dead 12 volt car battery: The 9 volt batteries did not work as well and the CDs eventually
stopped moving. The CD magnetic wheel is not supported on the top CD and is
only supported by a gutted CD drive on the bottom CD. Four magnets are
positioned with the north facing out at the four corners between the CDs.
Because the top is not supported it tends to wobble. But with the 12 volt
batteries hooked up it has been going for over three hours (as of 5 pm Monday
Nov. 8) with a continuous wobble. It does not seem to be going faster or
slower. The wood board on top with two screws, along with the large CD case
cover on the side have no need to be there. They were put there as support so
I could put a smaller CD case cover over top of the spinning CDs in order to
give support. But I did not want to add any more friction to the system so I
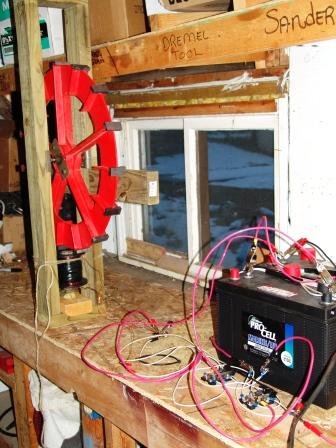
left it off. The coil is not mounted at all. The wires are #20 and #22.  Click the following for larger images: Radiant1.JPG Radiant2.JPG See the following clips for the low quality videos for each set up: Nov. 2004 A previous attempt was made last night with a coil wound approx. 900 times. But I believe I either made the circuit wrong, fried one of the parts in soldering, or wound the coil wrong by allowing too much space between the parallel 22 and 20 wires. I wound another coil only 500 times and did the whole unit over again. It worked right away. The plan is to find a non-metalic wheel and place 16 magnets around it and then add two more coil systems to share the wheel and magnets. This will make three times the charging capacity. I will wait for instructions as to whether I can share the imput battery with the other two proposed. I do not plan to change anything from what is called for and I am eager to work with John or others in taking the next steps. I am not going to attempt to test the current going into the charging battery (as advised) but I have checked the voltage of either battery from time to time. The power battery (deep cell) remains at the same voltage as when I started (12.14) but the other battery, which had little power left in it, has increased from somewhere around (I don't remember exactly) 12.04 volts to 12.34 volts in three hours.
Tuesday Nov. 9 I realized now that my problem with my first unit that did not work at all, was that I was using a faulty ground wire. I have not tried again to use that coil (with 900 winds). I had to move the unit off of the dining room table. It ran constantly from around 2PM till I moved it in the morning (10 AM). Voltage stayed at around 12.13 for the imput deep cell battery and 12.27 for the old car battery. When I moved it I also hooked up another old useless battery (both did not give much power when I removed them from my VW diesel Jetta (which I converted from a gas Jetta!) about a year ago. As a former VW mechanic I know a little about car batteries. But I know very little about radiant energy and these batteries. I did once have an old German boss who shared some things with me about how to bring back to life some batteries previously thought useless (even after being discharged and frozen! It was some 10 years ago, but I believe we did it by a long process of slowly charging them and quickly discharging them. Eventually we brought some of these batteries back to life. I have another regular usless car battery (with little useable power, and around 12 volts), along with another old deep cell that has been outside and not used for years (presumably useless). I will eventually try and rechage all of these. When I hooked up the unit again this morning I first soldered some of the connections to get rid of excess wires. The voltage had changed when I hooked up the two charging batteries in parallel. The first battery (which was charged all night) went down to 12.17 volts and the other was 12.13v. Also the powering battery was 12.11v. The CDs are moving around the same speed as they always have. I cannot tell how fast it is going. Before I put a book on top of the unit I could hear a fast rattle about as fast as I could count. It was at least 600 rpm. I was not able to sucessfully work the small coil to my sound card to measure the rpms. The wabble is much lessened since I put the book on top of the unit. It appears that it should continue to spin for a long time. If someone wants to make that unit they could either use two old CD drives (for the top and bottom), or use one as I have and be very careful to place the magnets exactly in place (so that they are balanced). I would try 6 magnets if I did it again. I used crazy glue. It was difficult because they tended to move once I had a few down. I glued two down opposed to each other and held the CD (which was not actually a CD but a plastic cover I got with my CDs) on top. Then I glued the others (while holding the top CD on the others still) and pushed them in place. I got glue on my nice wood table so it messed me up and the whole unit is now slightly off-center. [On a side note I found the CD drive motors (found three of them) are good low-voltage powered motors for testing things like solar power and other energy.] I am not giving too much attention to the voltages and timing of this experiment because I am more interested in the larger system above mentioned. All I desire with this experiment is to have useable batteries eventually. As of 2:20PM the voltages are: the powering batter 12.08; charging battery 1 is 12.20v; battery 2 is 12.17v. The last two have gone up around .03 volts while the other has gone down .03v. The CDs are still spinning the same. The coil is not mounted.
Thursday Nov. 11
Two new units.   Click the following for larger images: 6.JPG 8.JPG See the following clips for the low quality videos for each set up: I have made three more circuits but still have to wind the coils. I should have it done by tomorrow if I have enough wire.
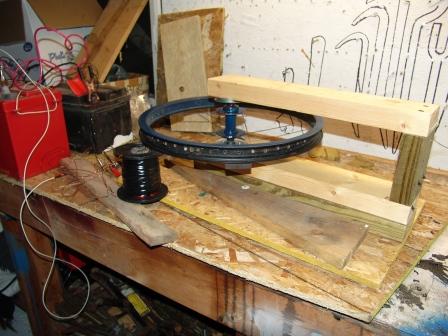
Nov. 12 I reworked the wheel so that 16 magnets could fit. I finished and added a second coil. I discovered a metalic spot on one section of the rim and hope this does not affect the charging too much. When I hooked up both units to the same two batteries I noticed an increase in voltage to the charging battery by two volts (compared to when only one coil and circuit was hooked up. But the powering battery did not seem to change in lowering voltage.I did my first amps measurement. Both units hooked up to the first battery showed .37 amps at around 10 volts. While the charging battery received .09 amps at just under 12 volts. Previous to this I charged my power deep cycle battery with a trickle charger because it was run down. I should also mention that this test and unit is at freezing tempteratures 32 degrees. The battery is obviously charging faster than the first one is discharging.
Nov. 17  
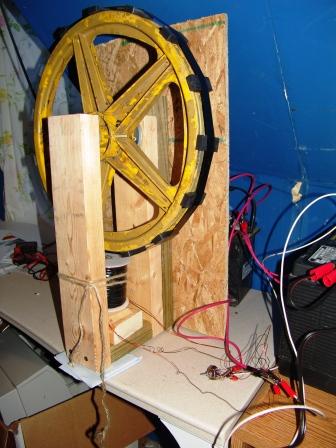
Dec. 4 04  Click the following for a larger image: 16a.JPG See the following clips for the low quality videos for each set up: I will quote a little from the letter to the email list: I started out with
the spinning CDs (which I soon upgraded to 6 instead of 4). They were still
spinning and charging two of my useless batteries (that I also had tried to
charge with regular chargers and which would not go above 12 volts, etc.) till
I used the circuit and coil for my new 17 inch wheel. The batteries took a
long time to rise in voltage. But in the last few days they have increased
faster. They were about 13.5 volts while I had not rotated them but kept them
on steady charge. They have not been charged with any other charger since I
started. The powering battery is the deep cell which has been charged with a
regular charger a few times. I think I am seeing something happening here. I
had read somewhere on the web site that the magnets needed to be separated by
at least 1.5 magnets for it to work. The CD magnets have that much space. And
the next setup I did had a little more space. But then Peter said I need to
keep the magnets at least three spaces apart from each other. I tried that on
my large wheel but that had too much resistance to continue to spin. But two
days ago I put together my newly found old 17 inch plastic wheel (yellow see
above). I put the magnets three spaces apart and set up a wooden frame. The
wheel would not keep spinning with the setup as in the others. My friend
suggested I spin it the other way. I did not think it would make a difference
but it did. And it has been spinning constantly since (until I moved it). It
did get faster and faster in the two days running even though that was not
corresponding to the voltage levels in either batteries (when they were higher
or lower the speed kept increasing). I have continued to rotate charging my
two new batteries. I am acutally showing a very slow overall drop in voltage
charge (with this and the other wheel). This new wheel has bad bearings though
(which are getting better!). We cleaned them out and put new grease in them
but they are worn. I will see what I can do about improving any of my three
bike wheels today (I have now made the two plastic wheels better). The other
thing that slightly works against these batteries is that they are in 20
degree F temperatures (the CD motors were inside though; but now outside).
This email was slowly written throughout the day as can be seen. I decided to
stop my successful spinning CDs to use my best coil and circuit for the new
plastic wheel with 15 magnets on it. I figured that that 17 inch wheel is more
along the lines of the SG project than the CDs. I set up the wheel inside
where the CDs were spinning (picture above) and it runs faster than I can
count (see video). What was interesting was that I had started charging the
deep cell powering battery and had it disconnected to the circuit. While
charging I had the wheel with a magnet directly over the coil about 1/8'. When
I connected the circuit I noticed the wheel started to spin by itself. Then,
because I had hit one of the magnets and was attempting to glue it back on, I
stopped the wheel by disconnecting the battery. When I connected it again I
noticed a faint very low rumbling sound with no movement at the wheel (while
the magnet was directly over the coil). I was going to record this sound but
first unplugged my charger (which is the new processor controlled kind). There
was no sound after that. The sould was coming from the coil and not the
circuit or charger. When I tried to do it again by plugging it in, I could not
make the sound. I gather that the sound occurred only when the charger was
charging. For my charger often keeps charging and showing a less than 100%
charge on batteries, even though when I unplug it and replug it in it will
then show 100% as is the case. So it appears that if I have it on charge with
no wheel movement, while the batter is not 100% charged, it might make that
noise again. I have not checked it again since 2 hours ago.  Click the following for a larger image: 13a.JPG
It looks like I will be able to charge up the 9v batteries much faster than the car 12v and deep cells. I have many 9v batteries for smoke detectors that all just died recently. They all went off within a few days beeping at me from every direction. They are all the same batteries discharged to the same point. Lets see if we can charge them all up! But the first batteries being charged are different from each other, one being dead, another being new. I will see how they charge over the next few days before I try and charge four or more of the same batteries mentioned.  Click the following for a larger image: 15a.JPG
Feb. 15, 2005.
March 19, 2005. 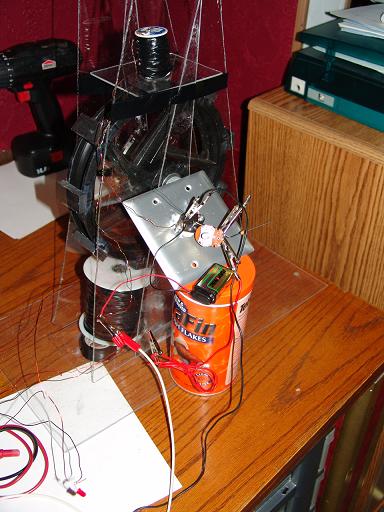 Later I will show step by step pictures as I built this machine. Here is the details so far: I used the following parts: 2 1/2 sheets of 18" x 24" x 1/16" (just a little bigger) medium strength extruded acrylic safty glazing sheet shatter-resistant plastic. This was all I needed to hold it all together. I did not need thicker plastic because I was only holding one coil and a small generator. Not planning to add anything else to this machine--its just a proof of concept machine. I doubled up the plastic as the picture shows. And there is 6 pieces of plastic under the coil and on top of the large 18" x 10" plastic foundation. I used 1/16 mild steel welding rods. "General purpose. Can be used on AC or DC welding current." I converted one of my first coils which had #20 and #22 magnet wire over 500 turns on a small coil. I replaced the old larger welding rods with the 1/16" ones. [This did not work with the 9v battery very long so I made another smaller coil. But this bigger coil I used to power an LED.]] I used a small 1 1/4 wide spool by 1 3/4" tall. I used #22 and #26 magnet wire, but got less than 300 turns on the small coil. Filled it with about 5 or six welding rods. I used a 9" plasitic bike wheel with its bearings and center bold. I added two larger washers. It has 9 radio shack magnets on it about 3 inches apart from each other from their center. I glued them and the plastic with crazy glue. Then I put electrical tape around the wheel/magnets to support the magnets (about three times). I used the same circuit as the original SG diagram. Used diode IN914. And optional 2N3055 transistor (I did not have the MPS8099). I used one 10 ohm resistor and added one 680 ohm resistor in series. I also played around with a 1k pot. I used one aluminum lite switch cover as a heat sink, with some silicon cream between the transistor and the aluminum. There is no neon bulb as in the modified SG circuit. Nor is there any secondary battery wires or diodes.
I do have continual rotation but not the right settings. My wheel is probably too big, and my coil does not have enough wire. Never mind the above setup. I did another one:
SEE OLDER PAGE FOR PROJECT ONE CONSTRUCTION AND TESTING
PUT
YOUR COMMENTS HERE AND LET ME KNOW WHAT YOU THINK OR WHAT YOU
RECOMMEND.
Copyright (c) 2004-7 Truth In Heart. |
